Assuming you have the game installed properly (see the README file for instructions if you haven't), you can start playing almost immediately by starting the executable. There are a few things to watch out for, though.
The first thing you may want to do is modify the default key bindings. You probably have a different gamepad than I do, and what works for me may not work for you. Changing the key settings shouldn't give too much trouble (though the procedure could be improved).
If you experience problems during play, consult the README file for possible ways to solve them.
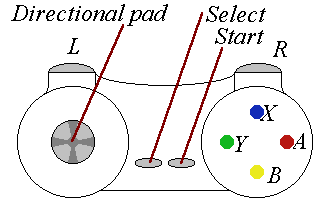
You have probably changed the mappings of the keys, so we will not refer to the keys by their physical location, but by their logical function. For reference, the default keymapping as it would appear on a SNES controller or GamePad Pro is shown.
The default key mappings are as follows:
| Action | Keyboard | Gamepad | SNES |
|---|---|---|---|
| Move up | up arrow key | dir. up | up |
| Move down | down arrow key | dir. down | down |
| Move left | left arrow key | dir. left | left |
| Move right | right arrow key | dir. right | right |
| Attack, confirm | left alt | green | A |
| Action | Z | yellow | B |
| Set bomb | left control | red | Y |
| Centre target | left shift | blue | X |
| Previous | Backspace | L1 | L |
| Next | Tab | R1 | R |
| Start | Enter | Start | Start |
| Select | Right Shift | Select | Select |
The attack button can be used to attack with your current weapon, provided you have one. Ranged weapons (ie, bows) require arrows to shoot. If you don't carry any arrows, you are unable to fire your bow. Press down and release the attack button to use your weapon. A targeting cursor will appear while the button is held down. Initially, you won't be able to move this around, but once you have acquired Tell's Ring, you can use the next and previous keys to move the target and direct your arrows more accurately. The attack button also acts as the confirm button in in-game menus (but not nescessarily the main menu).
The centre button can be used to recentre the target indicator if it has been moved.
Hold down the action button to open chests and locked doors and to interact with your surroundings. You can also hold it down to walk more quickly. This is useful to cross large distances if you're in a hurry, but not so useful if you're in a tight spot, since your maneuverability suffers.
Use the bomb button to set bombs. Bombs can be used to blow up weak walls, or damage enemies within the blast radius (keep a save distance - bombs can't tell friend from foe). While bombs are very powerful, their supply is limited, so use them wisely.
The next and previous buttons can be used to switch between any of the weapons you have found. They can also be used to switch targets if you have Tell's Ring.
The Start button pauses the game and shows you the equipment you are currently carrying. Use the directional keys to select an item to get a short description on its use. Pressing Start again resumes play.
Finally, Select brings up an option menu, where you can choose to quit the game.
Regardless of key settings, Escape will always exit: it will bring you to the main menu if you are playing and it will close the game if you press it from the menu. You can take screenshots by pressing Print Screen or F12.
![]() Now that you know how to move, it's time to start exploring the dungeons. Your
goal is to collect treasure and avoid getting killed. In each level, the goal
is to find the hidden staircase that takes you to the next level.
Now that you know how to move, it's time to start exploring the dungeons. Your
goal is to collect treasure and avoid getting killed. In each level, the goal
is to find the hidden staircase that takes you to the next level.
In each level, you need to explore caverns that may have doors on the left or right, leading to other caverns. Typically, these doors can be locked by a gate, or blocked by a slab of stone. To open locked doors, you must locate the keys hidden in each level (each level always contains just enough keys to open the doors). The slabs of stone can be pulled up by finding the hidden switch that controls them. You may also find weak walls that have cracks in them. You can try to open these by setting a bomb.
Aside from the main quest on each level, there are also side quests you may wish to explore. Each level contains two pieces of heart. If you collect four, you gain one extra heart container. Most levels also have a hidden item, such as a weapon or ring, that can help you later on.
Oh, did we forget to mention these caverns are gaurded? Hehe... a list of creatures you will encounter is included below. Avoid being hit by any of these creatures - they will drain your strength. Use weapons to attack the ghouls and monsters, but beware: different ghouls have different weaknesses and different weapons have different strengths...
You will find that not all doors are open when you find them. Sometimes you will need keys to open them, other doors will only open if the switch that controls the mechanism behind them is pressed down. But beware doors that will lock themselves behind you and remain locked until you have defeated all enemies in the room!
At the completion of each level, you will be given a password. This password enables you to restart the game at the next level. Your score will be reset to 0, however.
![]() When you are
wounded, your heart level will drop. Your current health is represented by a
row of small hearts in the status bar. Your heart level starts at three, but
it will increase by one if you find a heart container. You can also collect
four pieces of heart, which will also give you one extra heart container.
A small heart will restore your health, one heart at a time.
When you are
wounded, your heart level will drop. Your current health is represented by a
row of small hearts in the status bar. Your heart level starts at three, but
it will increase by one if you find a heart container. You can also collect
four pieces of heart, which will also give you one extra heart container.
A small heart will restore your health, one heart at a time.
The creatures you encounter will typically drop whatever they were carrying when you slay them. Beware: some of these items will only last a short while and disappear if you don't pick them up quickly enough.
![]() While small hearts will resupply your heart level one heart at a time,
potions restore up to five hearts.
While small hearts will resupply your heart level one heart at a time,
potions restore up to five hearts.
![]() Pickup arrows to replenish your supply. You can carry
up to 127 arrows. Note that at the start of each new level, you will be awarded
15 bonus arrows.
It is rumoured that somewhere in the dungeons you can find
steel tipped arrows that do more damage.
Pickup arrows to replenish your supply. You can carry
up to 127 arrows. Note that at the start of each new level, you will be awarded
15 bonus arrows.
It is rumoured that somewhere in the dungeons you can find
steel tipped arrows that do more damage.
![]() Always pickup any bombs you find - they will come in
handy later. You can carry up to 32 bombs.
Always pickup any bombs you find - they will come in
handy later. You can carry up to 32 bombs.
![]() Golden candleholders are worth 1000 points each.
Golden candleholders are worth 1000 points each.
![]() Collect gems for 1500 points a piece.
Collect gems for 1500 points a piece.
![]() The most valuable treasure you will find are golden chalices: they
award you 2500 points.
The most valuable treasure you will find are golden chalices: they
award you 2500 points.
![]() Use keys to unlock doors. You can carry up to 32 keys.
Use keys to unlock doors. You can carry up to 32 keys.
![]()
![]()
![]() There are also mysterious figurines hidden in the dungeons. Their
effect is unknown, but you should try to collect all three of them.
There are also mysterious figurines hidden in the dungeons. Their
effect is unknown, but you should try to collect all three of them.
Weapons come in various forms. In the course of the game, you will have the opportunity to upgrade them. Weapons do damage in either of four areas: Elemental (E), Impact (I), Cutting (C) or Piercing (P). Different creatures are susceptible to different attacks, so use each weapon with care.
![]() While a bow is useless without arrows, if you find arrows to go with it
the bow is a powerful weapon. It does 1d4 impact damage, 1d3 slash damage
and 2d6 piercing damage.
While a bow is useless without arrows, if you find arrows to go with it
the bow is a powerful weapon. It does 1d4 impact damage, 1d3 slash damage
and 2d6 piercing damage.
![]() Like the normal bow, a
crossbow is useless without arrows, but equipped with
arrows it is an even more powerful weapon than the longbow. Firing arrows more
rapidly than the longbow it does 2d3 impact damage, 1d3 slash damage, 2d8
piercing damage and knocks back enemies.
Like the normal bow, a
crossbow is useless without arrows, but equipped with
arrows it is an even more powerful weapon than the longbow. Firing arrows more
rapidly than the longbow it does 2d3 impact damage, 1d3 slash damage, 2d8
piercing damage and knocks back enemies.
![]() A wooden club is very useful against enemies that are vulnerable to
blunt attacks. Does 3d6 impact damage and knocks back enemies.
A wooden club is very useful against enemies that are vulnerable to
blunt attacks. Does 3d6 impact damage and knocks back enemies.
![]() Shorter than a sword, daggers serve a slightly different purpose: while
a sword is used for large sweeping attacks, a dagger is used for stabbing.
Does 1d3 cutting damage and 2d8 slash damage.
Shorter than a sword, daggers serve a slightly different purpose: while
a sword is used for large sweeping attacks, a dagger is used for stabbing.
Does 1d3 cutting damage and 2d8 slash damage.
![]() A longsword does 1d3 impact damage and 2d8 slash
damage and knocks back enemies.
A longsword does 1d3 impact damage and 2d8 slash
damage and knocks back enemies.
![]() A shield reduces the damage the player takes from impact attacks.
A shield reduces the damage the player takes from impact attacks.
![]() Chainmail reduces the damage taken from piercing and cutting attacks.
Chainmail reduces the damage taken from piercing and cutting attacks.
![]()
![]() Traps and poison should typically be avoided - they will drain
your health if you take them.
Traps and poison should typically be avoided - they will drain
your health if you take them.
Magical rings come in various sorts and with various effects. While some of the common rings are useful, you probably want to find the rarer rings as well.
![]() The Ring of Regeneration is a very powerful ring. It will resurrect you
when all your hearts are lost. Unfortunately, it loses its power once it has
been used. It is not useful to carry multiple Rings of Regeneration, since they
will all take effect at the same time, having the same effect as a single ring
would have.
The Ring of Regeneration is a very powerful ring. It will resurrect you
when all your hearts are lost. Unfortunately, it loses its power once it has
been used. It is not useful to carry multiple Rings of Regeneration, since they
will all take effect at the same time, having the same effect as a single ring
would have.
![]()
![]() Generally weak and relatively harmless, normal cavebats are still annoying
because they dart around quickly and are tough to hit. Don't bother trying to
smash them.
Considerably more dangerous than normal cavebats are vampire bats and werebats
that are rumoured to live in the lower levels of the caves.
Generally weak and relatively harmless, normal cavebats are still annoying
because they dart around quickly and are tough to hit. Don't bother trying to
smash them.
Considerably more dangerous than normal cavebats are vampire bats and werebats
that are rumoured to live in the lower levels of the caves.
![]() Despite their offensive body odour and a bad taste in clothing, these creatures
have one redeeming virtue: when they died, their brains died with them. Zombies
generally do little more than wander about aimlessly. If they carry any weapon
at all, it is of the crude sort, usually a club or a mace.
Despite their offensive body odour and a bad taste in clothing, these creatures
have one redeeming virtue: when they died, their brains died with them. Zombies
generally do little more than wander about aimlessly. If they carry any weapon
at all, it is of the crude sort, usually a club or a mace.
 Another mindless drone, usually no more intelligent than a Zombie, but because
they are even less tied to their former lives, some skeletons can be embodied
by an evil spirit. Skeletons take little damage from piercing or cutting
attacks, but are vulnerable to blunt impact damage. They lack the physical
strength of Zombies and so carry mostly swords or spears, if they are armed at
all.
Another mindless drone, usually no more intelligent than a Zombie, but because
they are even less tied to their former lives, some skeletons can be embodied
by an evil spirit. Skeletons take little damage from piercing or cutting
attacks, but are vulnerable to blunt impact damage. They lack the physical
strength of Zombies and so carry mostly swords or spears, if they are armed at
all.
![]() Mostly frightening, but not particularly dangerous. Ghosts typically move but
slowly and aimlessly and can be avoided easily. They take little damage from
ordinary attacks.
Mostly frightening, but not particularly dangerous. Ghosts typically move but
slowly and aimlessly and can be avoided easily. They take little damage from
ordinary attacks.
![]() An ethereal spirit trapped between death and the material plane. Ghouls never
carry weapons because they don't need any besides fear. Their malice and higher
intelligence alone makes them dangerous oponents, but they are also more
difficult to hit with physical attacks.
An ethereal spirit trapped between death and the material plane. Ghouls never
carry weapons because they don't need any besides fear. Their malice and higher
intelligence alone makes them dangerous oponents, but they are also more
difficult to hit with physical attacks.
![]() Skull-shaped gateways to the netherworld, this is where other ghosts and
monster enter the world. While Spawners themselves do not attack, they are
difficult to destroy except with blunt weapons.
Skull-shaped gateways to the netherworld, this is where other ghosts and
monster enter the world. While Spawners themselves do not attack, they are
difficult to destroy except with blunt weapons.
![]() Elite Spawners are a stronger version of the normal Spawner. While they too
serve as gateways, they will also launch fiery missiles. Once destroyed, the
Elite Spawner reverts to a normal Spawner.
Elite Spawners are a stronger version of the normal Spawner. While they too
serve as gateways, they will also launch fiery missiles. Once destroyed, the
Elite Spawner reverts to a normal Spawner.
![]() Daemons live on the brink of the spirit world and the world of the living. They
take reduced damage from most physical attacks as well as magical attacks.
The impact of their razorsharp claws is devestating. If this were not enough,
they also have the ability to call forth Bats similarly to the Spawners.
Daemons live on the brink of the spirit world and the world of the living. They
take reduced damage from most physical attacks as well as magical attacks.
The impact of their razorsharp claws is devestating. If this were not enough,
they also have the ability to call forth Bats similarly to the Spawners.
![]() Wizards are very dangerous foes. Their arcane powers allow them to reproduce
the abilities of other creatures, with devestating effect. Hits with some
weapons will disrupt their spellcasting.
Wizards are very dangerous foes. Their arcane powers allow them to reproduce
the abilities of other creatures, with devestating effect. Hits with some
weapons will disrupt their spellcasting.
![]() Beware these vile creatures of darkness! They are nearly invisible and their
supernatural powers and cunning make them very dangerous foes, not to mention
their considerable resistance to physical attacks. It takes special weapons to
kill them.
Beware these vile creatures of darkness! They are nearly invisible and their
supernatural powers and cunning make them very dangerous foes, not to mention
their considerable resistance to physical attacks. It takes special weapons to
kill them.
![]() Lurking in the depths of the dungeon is Serpentile, the guardian of the deeper
realms. No one knows for sure what he looks like, because no one who has ever
seen him his lived to tell the tale...
Lurking in the depths of the dungeon is Serpentile, the guardian of the deeper
realms. No one knows for sure what he looks like, because no one who has ever
seen him his lived to tell the tale...
![]() Lurking far below the surface because he cannot bear to see the light of day
is King Cula. To penetrate into the deeper realms you will need to destroy him.
Know that the art of summoning is but one of the powers that this monster will
use against you.
Lurking far below the surface because he cannot bear to see the light of day
is King Cula. To penetrate into the deeper realms you will need to destroy him.
Know that the art of summoning is but one of the powers that this monster will
use against you.